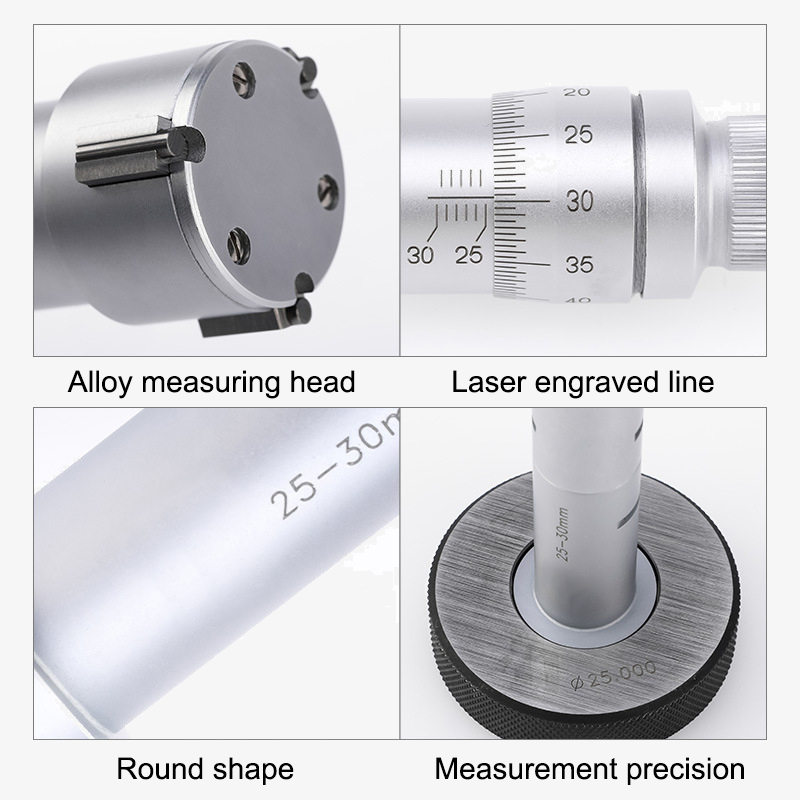
Order a 3 point inside micrometer with a 16~20mm range for measuring the inner dimension of the hole diameter, groove, etc. It offers a 150mm extension rod to measure the size of deep holes easily and conveniently, durable and stable bearing steel materials, clear scale for an accurate reading. High-precision internal micrometer is widely used in mechanical engineering, machining and most mechanical industries.

Inside micrometer with 16~20mm measuring range, suitable for the precision measurement of blind holes and through holes.
- 3 -point internal micrometer is equipped with a 150mm extension rod, which can measure the size of deep holes easily and conveniently.
- Highly durable because of carbide-tipped measuring surfaces.
- Clear graduations laser-etched on a satin chrome finish for easy reading.
- Spindle hardened ground and lapped for ultimate accuracy.
- SISCO inside micrometer built-in force limiter ensures accurate and repeatable readings.
Applications
SISCO inside micrometers is an instrument for making precise linear measurements of dimensions such as diameter, thickness, and lengths of solid bodies. 3 point internal micrometers are mainly used to measure inside dimensions like the inside diameter of a hole or tube, widely used in mechanical engineering, machining and most mechanical industries for accurate measurement of parts.

- Model: SISCO-SHAN-1620
- Range: 16~20mm
- Types: 3-Point Internal Micrometer
- Material: Bearing Steel
- Measurement Type: Internal Diameter Measurement
- Resolution: 0.005mm
- Extension rod length: 150mm
- Scale Process: Laser Scale
- Accuracy: 0.004/0.005mm
- Package: Plastic Box
Q1: What is an inside micrometer?
A1: An inside micrometer is a device designed to precisely measure things such as the inner diameter of holes. They look like fountain pens with a rotating thimble in the middle. Every time the thimble is turned, the micrometer expands. The thimble expands until the end of each tool touches the inside of the pipe, then a numbering system is used to find the measurement on the thimble.
Q2: How does an inside micrometer work?
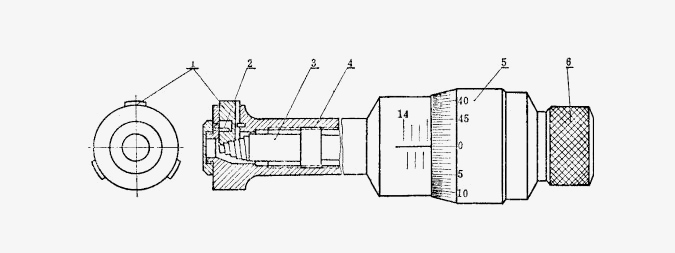
A2: The picture below shows a 3-point inside micrometer with a measuring range of 11~14mm. When the force measuring device 6 is rotated clockwise, it will drive the micrometer screw 3 to rotate and make it move along the helical direction of the threaded sleeve 4, so the square conical thread at the end of the micrometer screw will push the three measuring jaws 1 For radial movement. The elastic force of the torsion spring 2 makes the measuring claw fit tightly on the square conical thread, and expands and contracts with the advance and retreat of the micrometer screw. The radial pitch of the square conical thread of the 3-point internal diameter micrometer is 0.25mm. When the force-measuring device rotates clockwise for one revolution, the measuring jaw 1 will move outward (radially) by 0.25 mm, and the diameter of the circle formed by the three measuring jaws will increase by 0.5 mm. When the microtube rotates once, the measurement diameter increases by 0.5mm and 100 equal divisions are engraved on the circumference of the microtube, so its reading value is 0.5mm÷100=0.005mm. This is how an inside micrometer works.

Tips: Errors of the Inside Micrometer
The direct measurement error of the inside micrometer includes the force deformation error, temperature error and indication error of general measurement, reading aiming error, contact error and zero alignment error of the length measuring machine. The main factors affecting the measurement error of the inside micrometers are force deformation error and temperature error.
Thank you for buying industrial test and measurement equipment on SISCO.com, all products sold by SISCO and the partner cover a 12 months warranty, effective from the date of receiving the products.
What is covered?
SISCO is responsible for providing free spare parts, and free technical support to assist the customer to repair the defective products until the problem is solved.
What is not covered?
- Product purchased from anyone other than a SISCO store or a SISCO authorized reseller.
- Expendable parts.
- Routine cleaning or normal cosmetic and mechanical wear.
- Damage from misuse, abuse or neglect.
- Damage from use of parts other than SISCO approved.
- Damage from use outside the product’s usage or storage parameters.
- Damage from use of parts not sold by SISCO.
- Damage from modification or incorporation into other products.
- Damage from repair or replacement of warranted parts by a service provider other than a SISCO authorized service provider.
- Damage caused by the application environment not meeting the product usage requirements and the failure to perform preventive maintenance.

