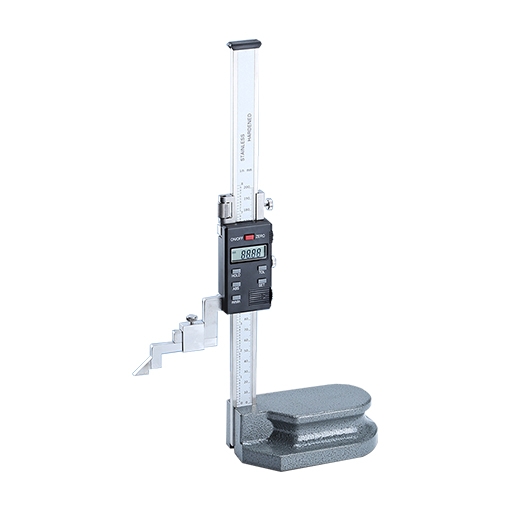
A Height Gauge measures the height of a workpiece, it is a measuring instrument in which a slider with a measuring stylus moves relative to a measuring scale on a beam, and in which this motion is along a single vertical axis nominally perpendicular to a reference plane on the instrument base.
Height gauges are normally used on a granite surface plate to measure and/or scribe part features from a datum plane. Generally, a scriber, Dial test indicator, and Dial indicator are used to locate the measured feature. Digital height gauges are an indispensable instrument for quality control.
How to use a digital height gauge?
- Preparation: Before testing, make sure that the surrounding environment has no obvious vibration, no dust, and the ambient temperature does not change by more than 1°C. First use a dust-free cloth dipped in absolute alcohol to wipe the surface of the altimeter’s ceramic stand and the altimeter head, and check whether the altimeter is placed correctly. Plug the power cord and data cable of the altimeter into the corresponding interface, turn on the switch behind the digital display device to start the altimeter, and there will be jumping numbers on the screen of the digital display device.
- Check the running status of the height gauge: At this time, lightly lift the buckle next to the digital height gauge rod with your fingers, and observe whether the number on the screen of the digital display device changes (it is normal if the value increases or the negative value increases), and then gently put the buckle until the rod touches the altimeter On the ceramic base plane of the altimeter, click the "Reset" button on the digital display device to reset the initial state of the altimeter to zero after it is started.
- Start the detection work: Wipe the workpiece to be measured, lift the buckle next to the height measuring rod with one hand, and place the measured part flat under the measuring rod. Fix the part and place it stably on the ceramic stand, then gently lower the buckle on the measuring rod until it touches the upper end of the part under test, and record the measurement data when the value on the screen of the digital display device tends to be stable. Lift the buckle next to the height measuring rod, take out the tested piece and put it away, gently put the buckle until the probe of the measuring rod touches the surface of the ceramic base, and then click the "Reset" button to complete a measurement of the workpiece. The batch measurement steps are the same as above.
Precautions for using the height gauge
- Keep the column, which guides the slider, clean. If dust or dirt accumulates on it, sliding becomes difficult, leading to errors in setting and measuring.
- When scribing, securely lock the slider in position using the clamping arrangements provided. It is advisable to confirm the setting after clamping because the act of clamping on some height gauges can alter the setting slightly. If this is so, allowance must be made when setting to allow for this effect.
- The parallelism between the scriber measuring face and the base reference surface should be 0.01 mm or better. Remove any dust or burrs on the mounting surface when installing the scriber and other parts securely fixed in place during measurement.
- If the main scale of the height gauge can be moved, move it as required to set the zero point, and securely tighten the fixing nuts.
- The error which is caused due to parallax effects is not negligible. When reading a value, always look straight at the graduations. Parallax errors occur when the position of an object is viewed from different points which thus impacts the accuracy of your measurements.
- After using the height gauge, ensure that water or oil is completely wiped away. Apply a thin coating of anti-corrosion oil and let it dry before storage. If a digital height gauge will not be used for more than three months, remove the battery and cover it with a protective cover if it has been provided. Avoid direct sunlight, high temperatures, and high humidity during storage.
The digital height gauge effectively avoids misreading during the measurement process. Its unique origin-type linear encoder can always maintain the set origin track before the battery is exhausted. The distance between the spindle and the origin can be displayed on the large LCD screen when it is turned on. Actual position. Whenever the machine is turned on, it can be measured without presetting the origin position.